Saturday, September 15, 2012

Master Bedroom REVEAL - Part 2, "During"


Click Here to see Part 1 of Master Bedroom REVEAL - Before Pictures

This segment is going to be pretty short, just showing a few "in the middle" pictures of the process!  One thing is for sure, those beautiful and gorgeous pictures on blogs and Pinterest of the bedroom makeovers don't show how much work and MESS is required to get it that way!! I never knew until I dived in, wow, talk about needing a vision in the midst of it all!

Please excuse the crappy picture quality - THAT is one of the main reasons I upgraded to the Iphone, for the awesome camera on hand at all times!  But this gives you an idea of what it looked like in the meantime, anyway.


When I was finished with all the priming, my room already felt AMAZING.  The difference between the fresh white and the dark and gloomy (with only one window, it really was!) red/green combo was just phenomenal.  I knew immediately that my decision to really go 100% in a totally different direction with my colors was a good one!  


I was tempted to leave it all white for a long time. =) Just so crisp and clean! Kind of like snow, how everything becomes brighter even at night, and hushed.  This really showed me how much paint does make a difference, even if it's ugly looking primer lol!


The debate on the room color, what shade of blue, was long and grueling.  I ended up getting pregnant right after I painted these on the wall and spent a good 4 months after that with day & night nausea.  Lots of time to think about it, and end up hating ALL OF THEM because I was so sick ha ha!  One thing is for sure, the colors online are almost always NOTHING LIKE what they look like off of your computer screen! 


At first, I was SO excited to start putting up the board & batten that I just bought this little saw and cut the boards myself.  It was hard work and my large pregnant belly sure didn't like that seesaw back & forth movement -- but I was so determined just to get STARTED already!  

Putting up that first long board, not nailed or anything, gave me butterflies! I just knew it was going to completely change the entire look of my room and I couldn't wait!  I also couldn't believe that after almost a year of surfing the net and reading and pinning, I was actually going to do it too!! Squeal!

DH ended up showing me how to use the electric saw (scary! But bad ass once I figured it out! lol) and oh my Lord.  like 1,000 times easier.


Caulking, caulking, many hours of caulking and painting soooo many nooks and crannies.  Listened to lots and lots of Dave Ramsey and other talk shows -- little by little I got it done.


I did everything you see here by myself, on these two walls.  Measured x1 million, cut the boards, everything.  Then, being 7 months pregnant and all, my Dad took pity on me and helped me for 2 solid days to finish the rest of the room while DH took the kids away.  So nice of him to do that!  He even painted the ceiling for me. (heart)


This corner was really tricky, and I did lots of research online as to HOW on earth to cut the boards when you have the rounded corners on the wall like this.  We have two in our room, but the rest of the house has lots more so I wanted to make sure I did it right -- I plan to do more of this kind of thing in the rest of the house in the future.

DH to the rescue!  He has mad hardwood floor installing skills, and knew how to cut these weird and funky angles that someone as novice as me could never come up with.  Everything *I* did was from tutorials online...and there was just nothing like this anywhere!  It looks amazing now, all caulked and painted.


My other big painting project was to take my old, faded, ugly faux oak bathroom cabinets and paint them BLACK!  Oh my goodness did this ever make an amazing difference!!! I highly recommend it, and I am going to do it in my kitchen which has the same thing, in the future.  


Lots of work and lots of MESS.  It was tricky keeping the little ones out of these open drawers!  

That's it for "during" pictures -- thanks for reading!

Click Here to see Part 3 of Master Bedroom REVEAL - After Pictures

Master Bedroom REVEAL - Part 3, After Pictures


Click Here to see Part 1 of Master Bedroom REVEAL - Before Pictures

Click Here to see Part 2 of Master Bedroom REVEAL - After Pictures

Now comes the FUN part!!! Woot woot!

Let's have a moment of silence in memory of the before picture:


Ahem. Moving on...

I totally and thoroughly enjoyed taking these pictures and seeing my room once again through fresh eyes.  I truly still absolutely positively LOVE it, even after almost a year of living in it now!  Funny thing is, I honestly do not have an eye for decor.  Promise you I am telling the honest to God truth.

However, Pinterest has completely changed my life in that area!  You know how, when you get braces, you notice everyone's braces all of a sudden?  Or when you're into keeping your kitchen sink super sparkling clean (yes FlyLady, talking about you!), you start noticing other people's sinks are pretty yucky looking even if they have the most beautiful home?

It's got to be the same thing with Pinterest.  After looking at my favorites over & over, and seeing picture after picture and blog after blog, I started to trust my gut.  If I immediately got flutters in my stomach I knew it was a style I loved!  Others, not so much, so then I knew what I didn't like.  In the end I realized that for some reason, the combination of white and blue was IT for me.  With gray, silver, black, crystal, and then a POP of color.  Still working on that one, so far green in plants has worked great -- but I would love to add in a pop of bright pink or bright yellow.  See, still pretty insecure about my abilities lol!

My point is -- I realized that I especially adore white.  The milky, flowing into endless white with no seams....no color to stop your eye from the soothing clean and freshness that is pure white.  So whenever I wasn't sure what color to paint something or what color of this or that to buy, I decided that my motto was going to be WHITE always works.  I love white on white on white on white.  Probably because it's impossible to have WHITE in any other area of my house with 8 kids! =) Gotta be real here!

(can I just say, is that not a breath of fresh air after the above picture?)

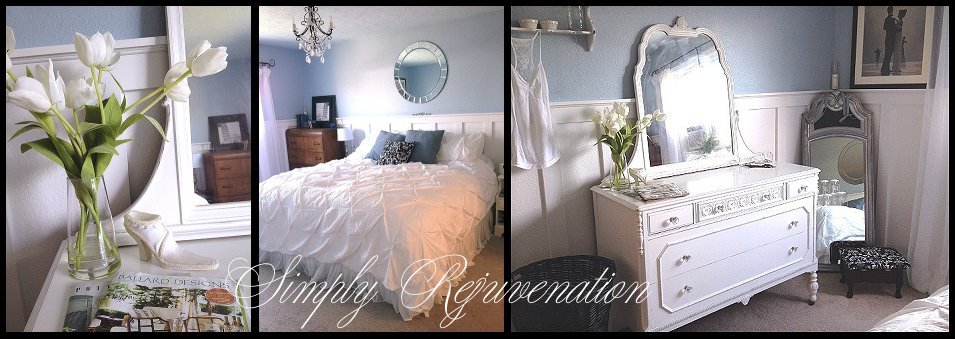
Here is my favorite after picture that really captures the essence of the look I was going for, which is French Shabby Chic in Paris.  I wish Blogger didn't make the pictures so small, it just takes away the fun details!  Be sure to click on the picture to see a bigger version with more pretty details. BTW the curtains are NOT pink.  I just forgot to turn off the bathroom lights to the right, oops, and you can also see the yellowish cast on the bed. Ah well, it's still a purty picture!

The gorgeous king size duvet cover is from Target, love love love it.  Exactly what I was looking for!  It came with two matching shams, so I was one happy girl to have found that -- the set was $60.  Flowy stunning, In Love With bedskirt I found online somewhere for $30.  It's sheer chiffon with an inside liner of white, and is pretty fragile, unfortunately.  My bed is pretty high so the kids step on that bottom box spring to get up and it has already ripped at the seam in several places which I promptly either safety pinned or stitched. =( 


The mirror was one of my favorite finds!  Squeal! I knew exactly the look I wanted for this bedroom, I just loved the sunburst beveled mirror look.  I found this one on Craigslist advertised for $50 -- the picture made it look like it was about 8" by 8".  I remember when she responded to my email by saying it was 36" across!! Whaaat?!!  Oh my gosh! Upon arrival -- she had THE most amazing to die for home, one whole wall was a humongous beveled mirror!  This one had a small chip that she had just found, so she offered it to me for $35.  On the back: Pier One tag for $199!!


The blue pillows on the bed I found at JCPenney's for $19.99 for the set.  The pillow in the middle, is actually a Target reject found at Goodwill, it's silver with funky sparkling embroidery.  It was only $6 so I took a chance, and it was just TOO much funk for my bed.  I had purchased a small quilting square of material at JoAnn's a while back that I thought I might use to line the dresser drawers with (modpodge) and it was the perfect size to be safety pinned to cover one side only of the pillow, lol.  So just don't pick up the pillow when you come in my room and flip it over....


Chandelier, purchased on Ebay for $120.  I spent many hours poring over chandelier's on half.com, Amazon, Ebay, even Ikea.  I wanted the look to be like clear ice, the perfect glam to the otherwise flowy and romantic room.  The black scroll design is beautiful against the crystals.  It came with little lampshades which I took off immediately lol!  DH had quite the time installing it, he came to my rescue on that one.  I have to say...it absolutely and positively MAKES the room. It is so stunning, reflected in every mirror - just, wow.  Love, love, ADORE.


This is the view from where I sleep - it's my favorite!!  I love how the sheer curtains soften the light, love that the ceiling color is 25% lighter than the walls (that's literally what I told the paint lady, just to lighten it 25%) and makes for the yummiest, dreamiest blue soft colors ever that just flow and eb and make for a gorgeous morning light!


The dresser was one of my all-time favorite finds on Craigslist EVER, hands down.  It was $45 (!!) and a deep brown wood, very old -- it had that old musty smell to it.  It belonged to the previous owner's great aunt-in-law and she didn't really care lol.  Kinda dirty, lots of dings -- of course I wish I had taken a picture of it!! This was my second biggest project that I tackled, having never actually painted furniture before.  I sanded it as much as I could to get the finish off, making the top nice & smooth.  Very heavy, I had to drive 45 minutes with 5 crying kids to see it, pay for it, and have DH come get it the next day. =) It was my changing table up until just a few days ago!


This picture shows the dark brown color it originally was, still inside the drawers.  I knew exactly the look I wanted, complete with the matching larger sized crystal knobs from Home Depot -- french feminine chic with a touch of Paris.  Love it sooo much!  The mirror actually is not attached to the dresser, it's just leaning against the edge.  The mirror is also really old and has lots of smudges and a scratch or two -- but I figure whatever, it's the beauty of decorating in antique; anything goes!


The black wicker laundry basket was from Ross for just $5.99...I kind of feel like it's a bit too much black, and am on the hunt for something probably white instead.  But for now it'll do, especially so cheap!


Love these tulips from Ross - they look so real!  I am not brave enough yet to add in major pops of color, so the subtle green with of course, white tulips, in the glass vase with faux water just called out to me immediately.  I think this was $19.99 so pretty spendy, but I really love what it adds to the whole room.  The shoe was my very first piece of decor I bought, at Goodwill, long before I started my room.  Kind of like a promise of things yet to come! I suppose you could say I designed my whole room around this shoe, lol!  Catalogs are Ballard Design & Pottery Barn.


I love doing these types of fun little decor projects, and love having surfaces to decorate!  This is one of my favorite necklaces to wear on date night -- lots of good memories of feeling like a princess!  Found these 3 little jars at a thrift store somewhere.  One has a candle in it, and the other a few of my silver diamond (faux) rings.  My little ones keep on trying to pick up the necklace and put it back in the jar, lol.  It concerns them that it "spilled". =)


I love the double doors in my bedroom - one of them is locked into place all the time, but it's just that added little bit of charm that makes a room, you know?  I bought this dress at my favorite thrift store for a few dollars, loved the color, haven't worn it yet but I love the way it kind of blends in with the blue in my room!  So I just left it hanging there with a silver & black diamond necklace...waiting for the perfect date night occasion! (and maybe just a few pounds less of weight....hmmm)  Notice the gold knob on the door?  This is on my "to do" list still - I want to switch to nickel plated knobs. (heart)


This is a sweet little shelf that I bought at Goodwill for $4.99, it came like that! Already white shabby painted over dark wood.  I love the curves and also the little nails in the dips...perfect for hanging things like a crystal stolen from the chandelier, a silver chain, and a few jars & pretties picked up here & there.  The lace camisole I bought at a thrift store thinking it was so pretty!  Haven't worn it yet (maybe under the blue dress??!!) but until then, it looks dainty and feminine in my french room!


The jury is still out on that picture - picked it up at a garage sale for $15.  It's more on the cream side and I'm trying to keep everything white white...but I do love the couples dancing in the dreamy mist with the moon.  The colors are the same blue, and black, as my room so -- we'll keep it for now.  


The mirror, ah, that mirror!  Such a heart pounding find at Goodwill --- I think it was $12.99 and it is BIG and heavy.  It was kind of dirty, and where you see black, was all silver but with a big huge smudge almost like someone had put duct tape on it and then took it off and it ruined the paint.  I slapped on some of my regular black paint just so it would look decent, right before I had the baby.  But I plan to repaint it with chalkboard paint and write a french saying in fancy script!  I was going to paint it all white but instantly fell in love with the depth the silver adds to my room, once I got it in there.


This little stool I found at Goodwill for $4.99, and loved the little curvy legs.  I was originally going to paint it white, but ended up leaving it because I just LOVE that dark wood next to the white!!  I recovered it in the same quilt square from JoAnn's that matches the pillow on the bed.  Someday I hope to get hardwood floors in that same color throughout the house.


I love my window dressings - love the sheer, love the black ribbon with a round crystal orb in the middle that makes rainbows dance in my room, just everything about it!  Except the ugly air conditioner, but, it makes my beautiful room a cool one in the heat of summer which is in my book 100% okay. =) Also the blinds - I plan to get wooden ones soon!  I found it to be a challenge to take pictures of a window during the day so, this one was taken at night.  Notice the shadows from the chandelier? So fun at night!


I found this lovely little rod at a garage sale for $2, it's super cheap quality and turns out it's Walmart brand, lol!  But does the trick, as the curtains that I have up on the window are very light and sheer so it doesn't need to be heavy duty or anything.  This is what made me decide to go with the black chandelier -- it ties in nicely with the curtain rod, pillow on the bed, chandelier, and bathroom sink base.  The curtain rings were from Amazon, super easy and I love the dainty detail they add to the rod and a little more black for the room.


Daytime picture of my window sill -- LOVE this little fern!  The basket I found at Goodwill smashed in with many other rejects...it had an UGLY plant in it that I promptly threw in the trash! Found this adorable baby fern at Michaels and loved the end result!  It looks especially nice in the winter when the air conditioner is gone.

The curly iron scroll is one of my favorite finds because it was actually nailed to a scary looking canvas picture.  I had two of them, each had one of these scrolls nailed on the top & bottom. I unscrewed them, painted them white, and you'll see them in various places around my room including under the big round mirror sitting on the board & batten.  Love little details like that!


Another lovely pretty -- I tend to pick up anything with crystals like this just in case I can find a good home for them in my room.  This was a candle holder -- I removed the top part, and it became something...um...unique? Whatever, I love the whimsy of it!


Yes, my dear husband does sleep in this room -- and this is his side.  My original plan was to paint both his nightstand and the dresser white, but I ran out of time....3 weeks until my baby was due and I was still working on the big white dresser!  So it had to stay, and bugged me to NO end.  Aaagh! Brown! Then one day a friend of mine came to see my room who is to me, THE most talented decorater I have ever met.  Her style is one I could only hope to copy, I adore it!  The first thing she said was that she loved the brown, it "grounds the white"!  Oh! Oh yeah, it sure does! Ha ha there goes all my supposed knowledge. =)  


It works out well because now he can have his kind of more masculine side to the room, and I also attempted to make it so when I added in the few decor items on top of his dresser.  The picture is from Ross, $14.99.  I bought the books specifically in those colors to blend in with the blue hues -- I have no idea what the titles are, lol!  The little chair serves as a change catcher -- perfect!


The rocking chair peeking out from the corner, I fell in love with upon sight at Goodwill for $39.99.  It was an oak sort of color, but very old.  The seat had a gnarly roses ooold print that I immediately took off when I painted it, and underneath the stuffing is HAY!!  It's really really old, pretty neat. 


 I am not finished with it, actually -- it is just primed.  I was planning to do the same white antique-worn look as the dresser, but I am really liking the "white washed" look.  The seat is all torn up so to cover it's ugliness I draped an eyelet lace square pillow case I found at a garage sale for 50 cents.  Certainly does the trick, for now!   It's got these 5 little "button" looking things at the top middle, that remind me of those old fashioned women's french boot buttons!  Unique and pretty with lots of personality.


My nightstand that I painted white -- it was an awful oakish color.  I drilled a hole and added the crystal knob so that it kind of looks like it matches the dresser.  It holds all my decorating catalogs, and I love the dark basket with a candle in it to, again, "ground the white." =)  The two lamps on my and DH's nightstands, I found at Salvation Army for $10 total.  They were both already nickel silver...I just added the matching lamp shades from Lowe's for $8 each.  One is taller than the other, I wanted something similar but not matchy matchy and was so happy to find them at the same time!


The drawers here were an awful faded oak.  Very faded, and had no knobs.  Painting it black really made the white counter top POP and completely changed the look of the whole room!  I wish I had a good before picture of the oak look.  Note to self: take better before pictures!  The light was brass and on clearance at Lowe's for $9.99.  UGLY.  Painted it black and DH rescued me by putting it in for me.  


I love this little corner of my room!! So bright and cheery!  DH is gone on a trip during this photo session; normally his many different plugged in things (shaver, electric toothbrush, phone charger, etc) are contained in this silver basket.  It usually looks kind of messy, but at least it's not all sprawled out on the counter like before.

In the back you can see a mason jar filled with q-tips; sitting on a candleholder for height.  The faux wheatgrass was a $2 garage sale purchase, and the adorable "freshly laundered towels" rack was purchased for $20 at a local antique mall.  I LOVE it and would not usually pay that much (!!) but love what it adds to my bathroom!


The mirror was a Big Lots find for $29.99 that I knew immediately was exactly what I had been looking for. Love the chunky black frame that ties in the light with the newly painted black drawers.  You can see another one of those scroll thingies on the ledge, as well as a glass jar filled with extra crystals in the corner.  The silver bucket holding my toiletries is from Goodwill, and the glass soap dispenser from Ross Dress 4 Less was actually filled with pink rose scented lotion!  It was fun to get imaginative and find these little goodies.

Thank you for making it this far!! I look forward to sharing more before & afters with you as I slowly but surely transform my home.

The End. =)

Friday, September 14, 2012

Master Bedroom REVEAL! Part 1 - Before Pictures

I am So Excited to finally show you my bedroom!! I decided to do this in several parts because I want to document the WHOLE story and it's going to be one very long post if I keep it all together. =)

A little background...we have 8 children ages 13 & under, living in a 1300 square foot home built in 1994 with 3 bedrooms and a teeny backyard.  We are in a nice neighborhood and have been here for almost 14 years.  LOVE our home, it is actually a super cute starter home as it was when we bought it, pregnant with (awww so cute) our first baby after being married for just one year!  But....with all these bodies, it is definitely getting rundown and it seems like due to lack of money for our whole stay here, we have just been basically "existing" here.


For instance, our garage door opener ($200 to fix) has been broken for at least 3 years.  We last painted the interior when my 8 year old daughter was in utero.  Our cute little electric fireplace has not worked for maybe 9 years.  Trying to keep food on the table and all these kids clothed just kinda takes priority, you know how it is.  I've done my best with what I have -- and I have had lots of fun throughout the years decorating my whole entire house in an Italian/Tuscan theme from thrift stores and garage sales --- and the occasional Ross Dress 4 Less purchase.  Which isn't bad, not at all -- but now is getting just, old.  Tired.  Pretty much, late 90's decor.   I'm so done with it!

This is my living room at it's absolute finest, about 2 years ago.  Currently I have sold or gotten rid of just about everything you see except the brown chair and table/chairs lol!


For my 8th baby, after spending 7 YEARS in an ugly unfinished master bedroom I decided that I was going to "change my family tree" as Dave Ramsey likes to say.  I may suck at decorating (and I seriously did up until Pinterest, LOVE YOU PINTEREST!!!!!!!!) and we might not have ANY money for decorating, but I decided once and for all to start room by room and completely and totally REVAMP my house.  Make it so beautiful that I would LOVE to be there, and just love every single thing about it just like when I drool over the Pottery Barn catalogs.

And I wanted to start with my bedroom.  It absolutely gives me goosebumps and brings tears to my eyes as I look back now at how darn HARD I worked after days of already working hard with the kids, to little by little bring my room to magical life.  I can't believe I did it.  I changed my room!! Changed the entire look and feel of it.  It now looks like it is straight out of a magazine and I LOVE IT SO MUCH!!! My goal was to create a place that DH & I can go to relax, and it will be a place to call our own.

Something like a sanctuary.  No kids allowed in there to mess it up, lol, unless we are in there with them.

I also knew that with the baby coming, I would spend many moons in there nursing.  Like, hours upon hours upon HOURS --- and many nights turned into days into nights and well, you know how it is with newborns.  I didn't want to have one more postpartum in the ugly room that was before.


My room exceeded my wildest dreams, and I remember specifically THIS dresser that I bought on Craigslist and painted, loving it so much that it was my place of "serenity" and "peace" I went to during my natural labor when the birth pains were just too much to bear.  It.was.beautiful.


The rest of my house is in AWFUL shape.  Oh my word.  Seriously.  But.  My bedroom gives me hope!! It lifts my spirits because it's like being in debt -- one credit card is "completely paid off!!" One room is completely done.  Yes I have like a zillion other rooms and "spaces" to redo.  But just as if when one has a million credit cards, if you take it ONE AT A TIME and work diligently...little by little...it will happen!

I am determined to have the house of my dreams.  EVEN with eight kids who, um, destroy everything in sight even though they don't mean to.  EVEN with a very teensy budget.  EVEN with seriously minus zero time.  And I am going to do it myself!  My husband is awesome in every single way you can imagine, he works very hard to provide for our family so I can stay home with our children, and pretty much collapses when he gets home.  Often 12 hour days on salary, often traveling, in addition to putting in lots of hours fundraising for our church we are very involved in.  He's left it all up to me and I'm actually pretty much ok with that!

So.  My friends.  I am going to make it happen.  If I can transform a room like this, WHILE largely pregnant with baby #8, seriously anyone can do it!  Oh, I had such fun! So much fun and so many many hours perusing Pinterest and sneaking away while the kids were sleeping in the evening to shop thrift stores and garage sales on Saturday mornings early.  Craigslist became my friend and my husband's truck/pickup "delivery" service as well. (hee hee)

But it was also hard, too.  Really hard.  Hard because all day long I would work on just keeping the house clean, making meals, doing laundry, homework, morning to night taking care of my large family.  I felt a sense of urgency as the pregnancy progressed, knowing that my tummy was only going to get heavier and heavier and everything harder and harder.  Nights would come where I was so tired and my feet hurt, I told myself just to do one thing.  Each day, at some point, if I could do just ONE thing that was a forward step towards making my room beautiful and finished by the time the baby arrived, then It Would Happen.  Some days all I did was screw in a couple of lightbulbs.  Or wash one side of one door in prep for paint.  Slowly but surely it certainly did happen, and that gives me hope for the rest of the house now!

7 Months Pregnant...learning from my Dad how to operate a nail gun!

Also, let's talk money a little bit.  DH & I have been for the last 5 years trying to become debt free.  Ahhh yes, and you know what happens when you try to do THAT!! Things happen, like babies and unexpected legal fees and job uncertainties and lots of things beyond our control.  So I knew that even though I had all these hopes and dreams for my home, the only real reality is that everything would have to be done the absolute CHEAPEST way possible.

Read: do it myself.

Everything that I bought would have to be using my own "egg" money so to speak.  We did not have, and still don't, a "renovations" fund.  Ha! Yeah right.  Especially trying to become debt free, Dave Ramsey would, um, laugh so hard!

BUT.  Dave Ramsey (yes, we are Financial Peace University graduates!!) does say that each of us should, for sanity's sake, have a "blow money" fund.  (DH says do NOT call it that, haha! So we call it our "spending money)  The amount we came up with for our budget, was $50 each, per month.

Hmmm.

Not going to take me very far, but I'll take it!  I treasured that $50 and enjoyed spending it GUILT FREE on whatever was next on my list for my room.  Or saving even up to 3 month's worth so I could buy something special like my chandelier.

Other than that, the way I funded my "rejuvenation project" was by selling things around the house on Ebay, royalties from my Ebay sellers guide ebooks, flipping items I found for amazing prices at garage sales by reselling them on craigslist, birthday money, getting creative with investing my money.  I even won a giveaway for $100 on a blog for an outdoor weather cover company.  We don't have any grills or hot tubs or anything that needs a cover, so I did some research and ended up choosing 5 bbq grill covers JUST so I could sell them and turn them into something fun for my room.  When you are forced to, you can become very creative with ways to create money!

Click Here to see Part 2 of Master Bedroom REVEAL - "During" Pictures

Click Here to see Part 3 of Master Bedroom REVEAL - After Pictures

Friday, October 14, 2011

Master Bedroom Update!

Things are moving right along, and it is SO exciting to see it all coming together!!!! I love love LOVE what I am doing to my master bedroom and am so thrilled that even though I have like a jillion kids and a billion things to do -- if I work on just one thing every single day then eventually it does get done! I just have to not stress about it and let it work itself out as it just does. Not on my timeline but my family's.

Today I made leaps and SPRINTS in the progress though, and I thought to share a bit of what I'm working on with you! First of all I have to show off my bed, it is coming together so beautifully! I found the most gorgeous sheer cotton bedskirt that is sweeping and romantic and I love it!

I don't have very many pillows for my bed, and our twin duvet covers are coming in the mail (white, of course!) and I don't have a coverlet to go OVER those duvets so...I just kind of improvised (which is what my life is ALLLL about these days anyway! =) and used the white king duvet I got at a garage sale for $5 over the twin duvets. The king duvet is okay for now, but it barely hangs over the edges unlike a coverlet which would cover all the edges nicely, down to the bedskirt. I have one in mind that I LOVE but it is $99 AND it is dry clean only. =( Waaah! So probably not happening for me...another one I really like is from JCPenney and is only $69 and is washable, but of course I really love the "forbidden" one lol.

Yesterday I spent some time washing the front of the cabinet that holds our sink in our bedroom - the sink is actually IN our bedroom with a mirror and cabinets, and then there is another door that leads to the toilet/bathtub. So this cabinet is pretty much "in your face" as far as matching with the rest of the bedroom - I have included that whole area in the new plan for my room.

I also had to repair a big long crack in the main cabinet door so I used Elmer's wood glue to take care of that - it came out okay. I had to fill in the gap still with wood filler today and sand it down and it definitely does not look 100% but with the black paint I don't think I'll be able to see it.

I don't know how exactly it happened, but I was able to spend about 3 hours total on the cabinets today/tonight - first priming them all, and that is paintable in just 1 hour so I was able to move right along to painting! That was SUPER fun because I have been painting with WHITE for months and months now. White primer, white paint - yum, but it gets old after a while. Painting the blue of my room was really fun and I lay in bed looking at the dreamy-ness of it in the mornings...I love it!

So I was able to paint ALL the cabinet including the doors with one coat of primer, and then about 95% of it with one coat of black paint today! yay! It already looks AMAZING and the white just POPS -- I can't wait to do another coat (or two? We'll see) and then add the knobs...that is going to be so cool. None of our cabinets in our entire house have knobs, not even in the kitchen - so lame. Have you ever seen a Pottery Barn anything without knobs? Me neither, it's so mid 90's!

Here's a few pictures to leave you with - and yes, I am on pins & needles that one of the kids is going to touch the paint drying in my bedroom...aack! But they've been pretty good so far besides always asking if they can paint too. I just tell them not in my room, BUT when we do their room, they can help!

Pardon the mess - I'm realizing more & more that the beautiful after pictures of ANYTHING never show how extremely messy it was in the interum!


I enjoy painting very much. It is really rewarding to see something spring forth with new life from my own hands, and the only thing it takes is my time - it is very low cost once you have all the materials. I purchased a quart of very high end paint to do my cabinets (Benjamin Moore Advance Satin Blank) - it cost me $22, I know, TRUST me, ouch. But after painting just one coat on the cabinets, it looks like I barely made a dent in that can. So one more coat, is going to be not much either. I should have enough left over to paint a chair for my bedroom, and a king bedframe, AND maybe even the front door! I'd say that's a pretty good investment.

I also love shopping the "oops" paints at Home Depot and Lowe's - you can get pretty good paint for super duper cheap. I can't wait to do even more projects when I have had the baby and all the postpartum stuff is behind me...I have 6 weeks left to go until d-day now! =)

Wednesday, September 7, 2011

YOU can have the house of your dreams....!

The first part of this article really caught my attention and was so motivating for me, I wanted to share it with you! From Tim Layton at remodelingguy.net, who runs an awesome website with TONS of articles and how-to's:

Here’s the truth: You deserve the home of your dreams.

You do. I’m totally serious and I’m talking to you. No if’s, and’s, or but’s about it.

Write this on a little index card: “I live in the house of my dreams.” and read that out loud every day, like ten times in a row. I don’t care if anyone thinks you're crazy, even you.

The important thing isn’t that you’re sane, it’s that you live in a rockin’ abode. This will get you there. You just can’t quit doing it. Eventually you’ll make it true even if it’s not even close today. I’m telling you the truth.

Soon, you will start to feel a little motivated. RUN with it. Start doing something to make it happen. Like now. Maybe even just a little paint to start with?


This really resounded with me because, well, it's how I live like, my entire life! I simply can't just tackle one big project over the weekend because 1)I have almost 8 children ages 12 & under, and 2) I'm humongously pregnant right now. I know THAT will change, but the busy-ness of life definitely won't.

NONTHELESS I love love love what he said, about how I DO already live in the house of my dreams!!! Meaning ---- that I can transform each room into something beautiful that I love, slooooooowly but surely.

I'm working on the master bedroom right now, and I have such a vision for it!!! It carries me through exhausted days when I just don't feel like I can do anything in there, being 7 months pregnant and all, yet I just want it to change and look how it does in my head! So I just give it 30 minutes, and if that's all, it will slowly but surely transform.

Looking forward to sharing before & afters with you!! =)

Friday, October 8, 2010

"....and let patience have it's perfect work..."

Patience has been my motto lately. We had to put ourselves on a complete spending FREEZE for the past 20 days, for various unexpected reasons. We didn't even have money for bandaids!

So I've been just...waiting. Lots and lots and LOTS of ideas and chomping at the bit to get started with my home, but just concentrating on cleaning it more so that when I DO want to start painting, for example, it will be ready.

Yesterday we got paid and it looks like it's going to be another extremely tight month. We have more things demanding our money than we have money FOR, so even the small allowance we give ourselves each month, it looks like isn't going to happen.

After doing alot of research, though, it sounds like prep work is 75% of the work when it comes to painting. I have to first clean the area, which in itself takes quite a bit of time, soooooooo many fingerprints!!!! And then I have to spackle and repair the wall's many holes and little indents from various accidents through the years. THEN I have to use painter's tape and go over everything, oh that is also after removing the lightswitch covers, etc. THEN I get to do the priming of the walls. After that, I can paint.

So everything up to the priming is practically free, it's just my time. So I've been working on that.

But today I went to Sherwin Williams to browse and get pricing on some things - I have a 30% off all paint coupon that expires on Sunday. Waaaah! I don't think I'm going to be able to use it because ONE gallon of the good paint costs like $42! Ouch. With my 30% off coupon it would be just $29! That savings is hard to ignore....maybe I can squeeze it out of my grocery money? But then, the argument is that if I COULD squeeze it out of the groceries (and thus live on truly rice & beans, which I actually have a TON of, ROFL!) then theoretically that money should go for the new shoes my husband needs. Or the $180 copay for my dentist appointment.

I told myself that I am just going to be patient. I know I am going to do this - I feel like it is just time. My baby is getting older, I've never actually had a baby this old and not been pregnant (she's almost 15 months). In the meantime, I am looking at color swatches and borrowing books from the Library about how to paint, and doing a ton of research.

Wednesday, September 22, 2010

Thrift Store Finds!

I'm looking forward to posting some before/afters of different things I find at thrift stores soon! Still working on getting my house turned right side up so I can work in a clean environment - clutter just makes me crazy!

For now, I'll show you some fab finds I got at the thrift store recently. They instantly bring new life into my house and I love how little things do that - especially love the price tag. =)

First - a beautiful pillar-like stand for whatever I want! It cost me $6.99 but I was returning something so only had to pay $.59. The oranges didn't last long (my 11 year old decided to see if she could juggle, rrrrrrr) and now they have 3 pretty candles on them. In the future I plan to put a pretty cascading green plant on it to add some green to my home.

Next I found this GORGEOUS clock! It was $9.99 but I just couldn't pass it up, since I had store credit to use up at Goodwill. I didn't have a place in my mind to put it, but I knew it would look beautiful in my house. Turns out it looks really nice sitting under my Italian Chef I inherited when my grandparents passed away. I enjoy it in my kitchen every single day!

I hesitated when I saw this picture, but it just drew me. The colors are IDENTICAL to what I have in my house, except it's missing a splash of red. It really brings together the browns, greens, and tans so I ended up buying it for $4.99.

I put it above our 2nd computer desk in the family room, a room that has been sadly neglected for the entire 11 years we have lived here. Later, I added the fall bead wreath on the other side and an orange candle below with a black curly iron candleholder. Now this room looks a bit more loved!